The introduction of Microsoft’s Surface Pro LTE in 2017 marked the beginning of laptops featuring eSIMs, with other major brands like Lenovo, ASUS, Acer, Dell, and HP quickly following suit. Before this, users relied on free WiFi hotspots or tethering from mobile devices to connect their laptops, both of which had limitations in terms of security, reliability, and battery consumption. Laptops with eSIM compatibility offer a more flexible, secure, and reliable alternative, reducing reliance on mobile devices for connectivity and easing battery and data consumption concerns, making them a preferred option for users on the go.
In this article, you have a step-by-step walkthrough on how to install eSIM for laptops.

Before knowing on how to install eSIM for laptops, there are three essential requirements you need to have:
- A reliable internet connection is necessary; it’s best to connect via Wi-Fi or have a stable 4G signal.
2. Ensure your device supports eSIM functionality. If unsure, refer to the list of compatible devices provided below for available eSIM-compatible laptops:
Acer
- Acer Swift 3
- Acer Swift 7
- Acer TravelMate P2
- Acer TravelMate Spin P4
- Acer TravelMate P6
- Acer Chromebook Spin 511
- Acer Chromebook Spin 513
ASUS
- ASUS Mini Transformer T103HAF
- ASUS NovaGo TP370QL
- ASUS VivoBook Flip 14 TP401NA
Dell
- Dell Latitude 7210 2-in-1
- Dell Latitude 9410
- Dell Latitude 7310
- Dell Latitude 7410
- Dell Latitude 9510
- Dell Latitude 5410
- Dell Latitude 5411
- Dell Latitude 5511
HP
- HP Elitebook G5
- HP Elitebook G6
- HP Elitebook G7
- HP Elitebook G8
- HP Probook G5
- HP Zbook G5
- HP Spectre Folio 13
- HP Elite Dragonfly G2
- HP Spectre Folio 13
Lenovo
- ThinkPad X1 Titanium Yoga 2 in 1
- ThinkPad X1 Carbon Gen 9
- ThinkPad X1 Fold
- ThinkPad X1 Nano
- ThinkPad X12 Detachable
- Lenovo Flex 5G
- Lenovo Yoga C630
- Lenovo Miix 630
- Lenovo Yoga 520
- Lenovo Yoga 720 (2-in-1 models)
Microsoft Surface
- Surface Pro 9 with 5G
- Surface Pro 8 with LTE
- Surface Go 3 with LTE
3. Make sure your device isn’t restricted to a specific mobile network.
How to Install eSIM for Laptops

Manually
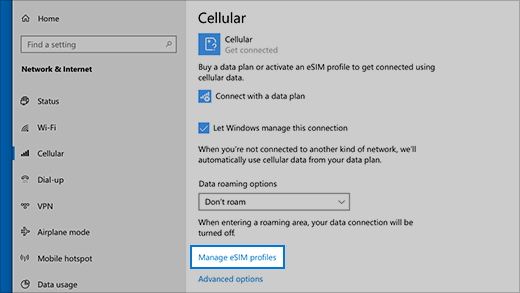
- Access the Windows Settings application and choose “Network & Internet.”
- Navigate to “Cellular” and then select “Add a cellular plan.”
- To manually install the eSIM, you’ll require your “SM-DP+ Address” and “Activation code.” Input them in the format of “1$Insert SM-DP+ address here$ followed by the activation code, for instance, JQ-1MU12G-CJN26F. The code should resemble the image provided below.
- Click on “download” to initiate the installation procedure. (Please be patient as this might take up to 10 minutes; refrain from closing this window to prevent interruption in the installation process.)
- Follow the on-screen instructions to finalize the eSIM activation process.
Windows 10
- To access the Windows 10 Settings, click on the Start button and choose the gear icon located on the left side of the Start menu.
- Navigate to “Network & Internet” within the Settings app.
- Within the “Network & Internet” settings, locate and click on “Cellular” on the left side of the screen.
- Under the “Mobile” section on the right side of the page, click on the “Add a plan” button.
- Choose “eSIM” as the type of connection.
- Enter the required details for your eSIM, such as the activation code, IMEI number, and any other relevant information based on your carrier’s specifications.
- Follow the on-screen instructions to complete the setup and activate your eSIM plan.
- Upon successful installation and activation of the eSIM, you should be able to utilize it for internet connectivity and calls, subject to the capabilities supported by your device and carrier.
Windows 11
- To access the Windows 11 Settings, initiate by clicking on the Start button and then selecting the gear icon situated on the left-hand side of the Start menu.
- Proceed to click on “Network & internet” within the Settings app.
- Within the “Network & internet” settings, locate and click on “Cellular” positioned on the left-hand side of the page.
- Under the “Mobile data” section located on the right-hand side of the page, click on the “Add a plan” button.
- Opt for “eSIM” as the preferred connection type.
- Input the necessary details for your eSIM, including the activation code, IMEI number, and any additional particulars required by your carrier.
- Follow the instructions provided to finalize the setup process and activate your eSIM plan.
- Once the eSIM is successfully installed and activated, you should be able to utilize it for internet connectivity and calls, depending on the capabilities supported by your device and carrier.
Conclusion
Bid farewell to pricey roaming fees, traditional SIM cards, and unpredictable Wi-Fi connections and remain connected in over 200 countries at budget-friendly rates while on the go with a laptop that supports eSIM technology. Fortunately, you can equip your laptops equipped with our BNESIM technology that provide a remedy to this problem. If you’ve experienced the hassle of hunting for a WiFi hotspot or relying on tethering from your mobile device, you’ll appreciate the convenience of laptops installed with BNESIM. These laptops provide a smooth and efficient solution to this problem.
